 |
| http://motivationintohabit.tumblr.com/ |
Wednesday, October 31, 2012
Saturday, October 27, 2012
Prenatal Exercise Tips - Prenatal Yoga Tips
Starting a Prenatal Exercise Program
Becoming fit during pregnancy requires safe, regular, sustained, moderate exercise -- now is not the time to embark on a new sport or engage in strenuous workouts. Even if you have never exercised regularly before, you can safely begin a workout program during pregnancy.
.jpg) |
Continuting Your Current Program
Most health care providers agree that if you are already regularly engaged in a sport or an exercise program when you become pregnant, you can continue it during pregnancy. Depending on the activity, you may need to modify, slow down, or change activities due to fatigue in early pregnancy or due to added weight and the normal softening of joint ligaments as your pregnancy advances.
Your body is your best guide and usually responds with pain or fatigue if an activity becomes inappropriate. Pay attention to these signals. Be especially aware of your lower back, hip joints, and pelvis-they are your most vulnerable areas.
General Exercise Guidelines
-Exercise regularly. You can't make up for lost time, and you shouldn't push too hard to catch up. Plan ahead and take this special time for yourself without fail. Make exercise a habit! (Remember The Half- Life of Exercise Theory: When more than two and a half days elapse between exercise sessions for the same muscle group, you lose the benefits of the first exercise session!)
-Stop if you feel pain. Modify your exercise program if necessary or substitute other forms of exercise. Check with your physician before resuming your program, but do so right away -- don't waste precious time.
-Finish eating at least 1 to 11/2 hours before working out. Otherwise, you may experience burping, belching, or abdominal discomfort as a consequence of exercising on a full stomach.
-Drink water before, during, and after your work -- out -- even if you aren't thirsty. It's very important to replace the liquids lost through exertion. Without sufficient fluid, your body becomes slow to react and easily fatigued. And it's best to drink four to eight ounces frequently, rather than taking one long drink.
-Don't go on a calorie-restriction diet during pregnancy. This is very dangerous for your baby. Eat a nutritious, balanced diet.
 |
I strongly suggest you try prenatal yoga! There are so many great benefits!
Prenatal yoga classes are more popular than ever. When paired with a cardiovascular exercise such as walking, yoga can be an ideal way to stay in shape during your pregnancy. This age-old practice keeps you limber, tones your muscles, and improves your balance and circulation, with little, if any, impact on your joints.
Yoga is also beneficial because it helps you learn to breathe deeply and relax, which will come in handy as you face the physical demands of labor, birth, and motherhood. In fact, one of the first things you learn in a yoga class is how to breathe fully. The breathing technique known as ujjayi requires you to take in air slowly through your nose, filling your lungs, and exhale completely until your stomach compresses.
Learning how to do ujjayi breathing primes you for labor and childbirth by training you to stay calm when you need it most. When you're in pain or afraid, your body produces adrenalin and may produce less oxytocin, a hormone that makes labor progress. A regular yoga practice will help you fight the urge to tighten up when you feel pain, and show you how to relax instead.
First-trimester yoga tips
 |
Breathe deeply and regularly as you stretch. If you're a pro at yoga, recognize and accept that your regular routine will require modifications as time goes on.
"Listen to your body and trust what it tells you," says Denise. If you're feeling pain or discomfort, make an adjustment or ask your instructor to recommend an alternative position.
Second-trimester yoga tips
Your joints are beginning to loosen up now, so proceed with caution. Be aware, too, that your slowly expanding girth will affect your sense of balance. Don't try to hold poses for a long time, and remember to sink into yoga positions slowly and carefully to avoid injury. Take your time and don't overdo it. Avoid lying flat on your back now, too, to keep blood flowing properly to your uterus.
Third-trimester yoga tips
You're probably feeling less graceful now that your belly is bigger, so perform standing poses with your heel to the wall or use a chair for support to avoid losing your balance and risking injury to yourself or your baby. Props such as blocks and straps can also help you move through different poses with greater stability.
And remember: Don't hold poses for a long time; it's important to keep moving.
This information is solely for informational purposes. IT IS NOT INTENDED TO PROVIDE MEDICAL ADVICE. Neither the Editors of Consumer Guide (R), Publications International, Ltd., the author nor publisher take responsibility for any possible consequences from any treatment, procedure, exercise, dietary modification, action or application of medication which results from reading or following the information contained in this information. The publication of this information does not constitute the practice of medicine, and this information does not replace the advice of your physician or other health care provider. Before undertaking any course of treatment, the reader must seek the advice of their physician or other health care provider.
http://health.howstuffworks.com/pregnancy-and-parenting/pregnancy/diet-exercise/how-to-exercise-while-pregnant1.htm
http://www.babycenter.com/0_great-pregnancy-exercise-prenatal-yoga_7862.bc
http://www.hipchickphoto.com/prenatal-yoga-maternity-photography-charlotte-nc/
http://mikadokids.com/tips-for-pregnant-women/benefits-of-yoga-exercises-for-pregnant-women/
Ballet Barre Workout
 |
Barre classes are a combo of ballet, yoga and pilates and work your arms, butt, thighs, and abs and engages the core in every exercise. Imagine lunges on relevé (tip toe) and exercises called the “pretzel”. It’s motivating and exhausting but afterward you feel amazing.
 |
The "Booty Barre for Beginners and Beyond" DVD was like taking a dance class - a dance class that made my legs shake, my hips burn and my mouth curse, but a dance class all the same. The workout is full of simple, basic ballet moves that target the butt, hips, and thighs. I immediately recognized some of the moves, like first position and releve, although it did take me a few stumbles to get the hang of them again. The motions themselves aren't difficult, but the slow methodical movements, and focus on proper form and squeeze is what makes them so obviously effective.
Order @......

Only $13.99!
Below are exercise not from the DVD but effective Barre exercises you can do anywhere!!
 |
 |
 |
Friday, October 26, 2012
Thinner Thigh Circuit
This Thinner - thigh circuit created by fitness experts will help strengthen and tone your whole lower body—especially those thighs. Strengthen, define and slim your thighs in no time with these power circuits!
For best results, perform 15 reps of each move, back to back without rest, up to four days a week. And be sure to couple your lower-body workouts with cardio exercise and a healthy diet to stay slim and trim for good.
Want to boost your burn? Try adding a set of 5-10 pound dumbbells to some of the strength moves for more of a challenge.
.
 |
.
SIDE LUNGE TO CROSSOVER TAP
Target your thighs from every angle with this move designed to hit your inner thighs, quads, hamstrings, and glutes.
How to do it: Start standing with your feet together, arms down by your sides. Take a wide step to the side with your left foot (your right leg should stay extended), and bend your left knee, pushing your hips behind you. Keep your back flat, eyes looking straight ahead, and reach both arms on either side of your left foot, touching the ground with your fingertips [A].
Push off the left leg and shift your weight back into the right foot, reaching both arms up to the ceiling, while you bring your left leg across the front of your body and tap your left toes on the floor, just past your right leg [B]. That’s one rep. Complete 15 reps on each leg.
Quick Form Tip: Focus on squeezing your inner-thigh muscles and drawing your abs in tight on the crossover tap to help with balance and control.
 |
RUNNER’S LUNGE TO BALANCE
This deep lunge and balance combo will help tighten the backs of your thighs in no time.
How to do it: Start standing with your feet together. Take a big step forward with your right leg. Reaching towards your right foot with both hands and hinging slightly forward from your hips, bend both knees into a low lunge (be sure to keep your right knee lined up over your right ankle at the bottom of your lunge. Don’t let your knee extend past your toes). Your left knee should be pointed straight down to the floor (like a sprinter about to start running) [A].
Next, press your weight into your right leg and push down through your right foot as you stand up out of the lunge, lifting your left leg off the floor and straight up behind your hip. Your upper body should maintain the hinged forward position as you stand, with your back straight, abs tight [B]. Balance for one count and then lower back down into the lunge. If it’s too hard to stand on one leg, try tapping your left foot lightly on the floor behind you as you stand up out of the lunge. Repeat 15 times and then switch to the other side.
Quick Form Tip: As you stand out of the lunge position, focus on one point on the floor in front of you. This will help you balance at the top of the move.
.
.
 |
SCISSOR POWER SWITCH
This move helps burn more calories while you work the power (fast-twitch) muscle fibers in your legs—a killer combo for trimmer thighs.
How to do it: Start standing with your right foot forward, left leg back and lower into a runner’s lunge, reaching your left arm towards your right foot and extending your right arm behind you [A]. Push off the floor with both feet, jumping straight up, scissoring legs midair, and land back into a runner’s lunge with your left leg forward, right arm reaching across. If an injury prevents you from jumping, try quickly alternating your legs with a rear tap instead of the jump. Do 15 switches (or alternating rear taps) total.
Quick Form Tip: Start slow to insure proper form on your landing (always keep your knees behind your toes on the front leg of your lunge). Progress into a faster speed when you’re ready to advance.
 |
DIAGONAL LUNGE
This multi-directional lunge helps build coordination and control while also toning and tightening your quads, glutes, hamstrings, and inner thighs.
How to do it: Start standing with feet together, both arms reaching overhead, palms facing forward [A]. Take a wide step with your right foot out to the corner of the room (at a 45-degree diagonal angle), bending your right knee and reaching arms and upper body forward over your right thigh (your back leg should be straight, with your heel lifted off the floor). See if you can touch the floor, on either side of your right foot, lightly with your fingertips [B]. Push off of the right foot to return to the starting position. Repeat 15 times on one leg, 15 times on the other. Modification option: Don’t go as low into the lunge, and aim to reach your hands to knee or shin level instead.
Quick Form Tip: As you stand back out of your lunge, focus on drawing your abs in tight, squeezing your inner thighs together, and maintaining good posture.
.
 |
PLIE SLIDES
This ballet-inspired move is a great inner- and outer-thigh toner.
How to do it: Start standing with your hands on your hips, heels pressed together and toes rotated out to the sides (about 45 degrees) [A]. Step your left foot out (wider than hip-width apart), into a deep “plie”: bend both knees out over your toes, lowering your body straight down to the floor, keeping your back straight and abs in tight [B]. Next, as you rise up out of the plie, slide your left heel back in towards your right, straightening your legs and returning to start position. Repeat 15 times with the left, 15 times with the right.
Quick Form Tip: Make sure your knees stay lined up over your toes on the plie, don’t let them roll in.
.
 |
LATERAL PLYO SQUATS
This quick plyometric interval will get your heart pumping and tone your hips, thighs, and glutes.
How to do it: Start standing with your feet together, arms down by your sides. Step your right foot out to the side (about hip-width apart) and bend your knees, holding both arms in front of body, sitting back into a squat: press your hips behind you (as if reaching back for a chair) and keep your chest lifted and eyes forward [A]. Quickly push off the floor with both feet, jumping up and to the left [B]. Land with your left foot stepping out to the side and back into your squat position. Modification option: Instead of jumping, simply stay down in your squat position and step your feet quickly from side to side to raise your heart rate without the impact. Repeat 15 times total.
Quick Form Tip: Use your arms to get your momentum going and to help you push off the ground.
 |
KNEELING ROUNDHOUSE KICK
This kickboxing inspired move is a great way to shape and tone the outer hips and thighs.
How to do it: Start kneeling on all fours (on carpet or a mat) with your arms extended under your shoulders and knees bent under your hips. Lift your left knee off the floor, bending your left heel in closer to your body[A]. Next, lift left knee (keeping it bent) straight out to the side of your body, trying to bring it up to hip height [B].
From here, extend your leg straight out, pointing your toe, shin and shoelaces facing forward [C]. Bend knee back in and lower it down, almost to the floor (but not touching). Repeat 15 times on the left, 15 times on the right.
Quick Form Tip: Draw your abs in tight and try not to lean away from your legs as you lift it into your kick—press both arms strong into the floor, keeping hips square.
.
.
 |
HIP EXTENSION AND CROSS
Tone the backs of your thighs, glutes, and your core with this targeted isolation exercise.
How to do it: Start kneeling and bend both elbows down to the floor below your shoulders, hands clasped. Extend your left leg up and behind your body, pointing your toes as the leg extends [A]. Next, bend your left knee and draw your left leg in, lightly tapping the back of your right knee with your left kneecap [B]. Extend left leg back out and repeat 15 times total, then switch legs and repeat (if you want to really feel the burn, try doing two sets of this exercise before moving onto the next move).
Quick Form Tip: Press both arms down into the floor to avoid collapsing into your chest, and keep your abs drawn in tight so that your lower back doesn’t sag.
.
 |
.
PLANK TO STAND UP
This tough move can help improve flexibility in your hamstrings and hips while also toning your core, legs, and back.
How to do it: Start at the top of a push up position, or a full plank [A]. Keeping your abs drawn in tight, step your right foot in between your hands, bending your knee so that your right thigh is parallel to the floor, keeping your back leg extended [B]. Push your weight into your right foot as you slowly stand up out of the lunge, leaning slightly forward with your upper body, and tap your left foot on the floor behind you at the top [C].
Next, bend your right knee and lunge back down to the floor, placing hands flat on either side of your right foot. Step right leg back to plank position and then repeat with the left leg. Alternate legs for 15 reps total.
Quick Form Tip: If it’s too difficult to stand up with your hands on the ground, place your hands on top of your front thigh for more support. Do the same on the way back down.
.
 |
SUPINE HAMSTRING CURL
This move shapes up the hamstrings and lifts that hard-to-reach spot where the glutes and hamstrings meet.
How to do it: Start lying face down on the floor, bend your elbows and stack your hands under your forehead. Extend both legs straight out behind you, pointing your toes and squeezing your heels together [A]. Press your shoulders down and lift both legs slightly off the floor. Keeping your feet touching, bend your knees (knees can open out to the sides slightly as they bend) and curl both heels in towards your body [B]. Without letting your knees touch the ground, slowly extend both legs back out straight. Repeat 15 times total (Try doing another set of 15 before finishing the workout if you can).
Quick Form Tip: Be sure to keep your kneecaps lifted off the floor during the full movement, and imagine you are pressing your heels into something as you bend your knees in, to really squeeze the backs of your thighs.
.
.
.
Sources:
SELF Magazine
Monday, October 22, 2012
Best Morning Yoga Stretches (You can even do these in BED)
 |
Waking up doesn't have to be something you do begrudgingly after pressing the snooze button nine times. It can be something you want to do, a crucial 5-minute window of opportunity that changes your whole day for the better.
If used wisely, the few minutes between being in dreamland and getting up can boost your best mood, kickstart your commitment to eat well, and increase your likelihood to work out that day — all while you’re still in bed! All that’s better than one more snooze button press, I’d say.
Whether your exercise form is yoga or not, studies say that if you wake up in a way that stimulates the body’s blood flow, balances the hormonal system and detoxes you, you’re more apt to continue those healthy habits all day long.
My clients love this next sequence, for its ability to do all of the above, plus shake off sleep and promote more energy and alertness, while maintaining a calm, centered mind. Studies, schmudies … my clients say that doing this sequence (or not) is often what makes them decide to continue on with their morning workout, or to skip it.
Beginning to move mindfully before the mind’s resistance gets involved is a magic bullet — before the other eye opens, you’ll already well on their way to an endorphin-filled morning, and a more focused, fit, and self-confident day.
Now, that’s worth waking up for!
DETOX BREATH IN GODDESS POSE

Directly out of sleep or snooze, come to lie on your back. Place the feet together, knees open wide. Rest one hand an your lower belly and one over your chest as you begin to take slow, deep breaths through your nose. Inhale, and expand your body so the hands rise. Retain the inhale for a few beats, then let your exhale happen naturally as the hands fall. At the end of your exhale, contract around your navel to gently press the remaining air out of your lungs. Retain the exhale for a few counts.
Repeat for 10 breaths.
HAPPY BABY

Start to work the kinks out of your low back and begin your cleansing inversions as you draw your knees back beside your ribcage. Press your hips towards the mattress, so your seat doesn’t lift up, and draw the knees down with fingers around the big toes, outer feet or behind your knees.
Hold for 5-10 breaths.
SUPPORTED SHOULDERSTAND

Take the pillow from behind your head and bend your knees to lift hips and place the pillow underneath. To fully detox, legs and hips must be elevated above the heart, heart above the head. So if more pillows are in order, keep ‘em handy. Lift your legs into the air, or rest them on your bed board or wall for more support.
Hold for 10 breaths or more.
SEATED EAGLE

Slowly roll onto your right side, and gently press up into a cross-legged easy seat. Wrap your right elbow over your left, bend the arms and touch left fingers to [or towards] the right palm. Lift your elbows to shoulder height, but drop the shoulders. Keep a long spine, and after a few breaths, try rounding the spine, chin to chest, to stretch the upper back.
Take 5-10 breaths here, then uncross arms and repeat with left elbow on top.
SEATED TWIST

Return to a neutral spine, and bring your left hand onto right knee. Reach your right arm into the air on an inhale, and keeping the spine long, exhale and begin to spin your chest, right shoulder and head to the right. Circle your right arm behind you, fingertips down. Inhales maintain the length of your torso, exhales help you to gently spiral through the heart and neck as you tone and spark your energy.
Take 5-10 breaths on each side.
FORWARD BEND WITH FISTS

After your twist, swing your legs off the bed and come to stand with bent legs. Make fists and place them in the opposite elbows (Bent elbows and fists trigger your body to release tension in the back muscles). Fold over your bent legs, and relax your back, shoulders and head completely. Breathe here, feeling any unwanted tension draining into the floor. BTW: This is a great pose at work, or anytime you’re feeling an energy crash and want to get back on track!
Remain in the pose for one minute, then slowly roll to stand, reach overhead for a full body-stretching inhale. Continue into your morning workout, or go start your day from center!
Sunday, October 21, 2012
Exercises That Will Help Keep Your Weight Loss Plan Successful!
 | ||||||
| Swivel Squat |
Stand with your feet hip-width apart, and extend your arms straight out in front of you. Bend your knees and sit back until your legs are bent 45 to 90 degrees; make sure to keep your knees from extending over your toes. (A) Press back to a standing position as you rotate your torso and outstretched arms to the right. (B) Rotate back to the center and immediately perform another squat, this time rotating to the left as you stand. Both sides makes one rep. The sequence is this: Squat, stand—while simultaneously twisting to the side—then twist back to the center. 10 to 12 reps To make the move more challenging, hold a medicine ball.  |
| Tricep Dip & Reach Sit on the floor with your knees slightly bent and your back as close as you can get it to a 20cm-high step. Grab the edge of the step with your hands slightly more than hip-width apart. Push your heels into the floor as you straighten your arms. Perform a dip (A). Straighten your arms, then reach your left arm straight out in front of your body at shoulder height while lifting your right leg (B). Hold for a few seconds, then repeat, lifting the opposite arm and leg. |
 |
| Mermaid Side Plank |
Assume a side plank position, with your right elbow on the floor directly beneath your shoulder. Stagger your feet so your left foot is in front of your right foot. (A) Raise your left arm directly overhead—bicep next to your ear, arm extended, and with your palm facing the floor—so your arm is in line with your body. Arch your left arm towards the floor as you raise your hips up in the air. (B) Return to start. Repeat for a full set; then switch sides. 8 to 10 reps
 |
| Step-Up And Single-Arm Press |
Hold a dumbbell in your right hand with your upper arm parallel to the floor and place your left foot on a step or bench (A). Lift yourself onto the step as you press the weight over your shoulder (B). Lower both back to the starting position. That’s one rep. Finish all the reps with your left leg, then repeat with your right.
 |
| Prone Oblique Roll |
Get in plank position with your shins about hip-width apart on a stability ball and your hands shoulder-width apart on the floor (A). Keeping your feet on the ball, draw your right knee toward your right shoulder (the left just comes along for the ride) (B). Return to center. Do 12 to 15 reps, rest for 30 seconds, then repeat to the other side.
 |
| Reverse Plank W/ Leg Lift Sit with legs outstretched, hands behind your butt, fingers forward. Press onto your hands, and lift your right leg, keeping hips raised. Hold 3 seconds. |
 |
| Curtsy Squat (bad form in pic) & lift Grab a pair of five- to seven-kilo dumbbells and stand with your feet hip-width apart, arms at your sides. Cross your right leg behind your left, slightly left of your left heel, and rest your toe on the floor just over half a metre behind you (A). Keeping your right heel up, squat down as far as you can without letting your left knee extend past your toes (B). Straighten your left leg and raise your right leg as high as possible behind you, lowering your torso toward the floor (C). Return to start. Do 12 to 15 reps and repeat on the other side. That’s one set. Do three sets, resting for 30 seconds between sets. http://www.womenshealthsa.co.za/fitness/workouts/2009-ultimate-fitness-plan-workout-2?page=11 http://www.womenshealthsa.co.za/fitness/workouts/build-muscle-to-get-strong-abs?page=2 http://www.womenshealthsa.co.za/fitness/workouts/best-workout-for-an-athletically-shaped-body?page=1 http://www.womenshealthsa.co.za/fitness/workouts/work-your-core?page=5 |
Saturday, October 20, 2012
Movement Prep For Running

\
five pre-run poses for better running
Whether you’re donning your first pair of trail kicks or training for your fifth marathon, adding a little yoga to your routine is a great way to amp up your run. Seattle University Village store ambassador, Erin Jasmine Taylor, shows us a five-minute, pre-run Jasyoga sequence that will help warm you up, align your stride and prevent injuries.
five pre-run poses to warm up your engine
For maximum benefit, complete the entire sequence in order and hold each pose for 5–10 deep breaths, engaging the muscles you need and relaxing the ones you don’t.
interlace and fold
 |
| opens chest and shoulders, stretches hamstrings |
• start by standing hip-width apart. On your inhale, bring your arms overhead.
• exhale as you reach your arms out and back, interlacing your fingers behind you—use a strap or towel between your hands if it’s a struggle. Take a few breaths here to broaden the chest.
• fold forward, taking your arms up and overhead, keeping bend in your knees.
• shake out your head and relax your neck. Eventually release the interlace and drop your hands toward the ground for the last few breaths.
high runner’s lunge
(from forward fold)

trains the knees to stabilize, strengthens and lengthens stride
trains the knees to stabilize, strengthens and lengthens stride
• take a long step back with your left leg and come into a lunge with your front knee at 90 degrees, tracking directly over the ankle.
• keep your back leg straight and your front knee stable over the ankle as you raise your arms overhead.
• find your balance, relax your neck and shoulders and breathe deeply—think less effort and more ease!
• keep your back leg straight and your front knee stable over the ankle as you raise your arms overhead.
• find your balance, relax your neck and shoulders and breathe deeply—think less effort and more ease!
high runner’s lunge with side bend
(from high lunge)

lengthens side body, stretches top of the IT band and improves balance
lengthens side body, stretches top of the IT band and improves balance
• place your right hand on your right hip, bend your torso to the right and reach your left arm overhead and to the right—stretching the left side of your body.
• remember to keep that right knee stable over that ankle!
• remember to keep that right knee stable over that ankle!
warrior III
(from high lunge)

strengthens ankles, legs, core and improves proprioception
• balance on your right leg and lift your left leg behind you as you drop your torso parallel to the ground.
• keep your arms out like airplane wings, or reach them forward.
strengthens ankles, legs, core and improves proprioception
• balance on your right leg and lift your left leg behind you as you drop your torso parallel to the ground.
• keep your arms out like airplane wings, or reach them forward.
low lunge twist
(from warrior III)

stretches hips and twists spine
stretches hips and twists spine
• step your left leg back into a lunge, dropping that knee to the ground and releasing your hands to the ground.
• put your right hand on your right thigh as you rotate your chest to the right, while keeping your left hand on the ground.
• reach your right arm up and look skyward.
• put your right hand on your right thigh as you rotate your chest to the right, while keeping your left hand on the ground.
• reach your right arm up and look skyward.
and repeat...
Return to your standing forward bend and repeat poses 2–5 with the opposite foot forward…
Now you’re ready to get sweaty and hit the ground running!
Erin Jasmine Taylor is the owner and head coach of Jasyoga, a mobile yoga studio that helps athletes around Seattle—from rec soccer players to NBA basketball players—find their flow. Special thanks to Nate Burgher for all the amazing photography!
This blog post was written by lululemon ambassador - Erin Jasmine Taylorand posted on May 10, 2012 at 9:10 am
Portion Control Tools

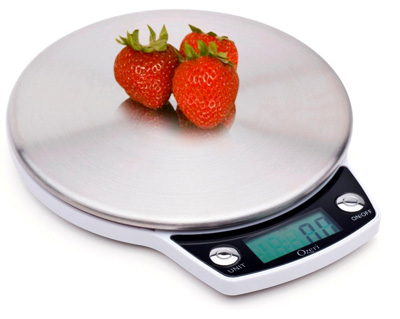 |
| http://www.amazon.com/Ozeri-ZK011-Precision-Stainless-Steel-Oversized/dp/B002UG4UM6 |
 |
Meal Measure helps you manage your weight, one portion at a time. It is easy to use and measures your food right on your plate. meal Measure fits most dinner plates. The cavities of the Meal Measure are labeled vegetable or fruit, startch, and protein. Each Meal measure cavity is one cup at the top with a one-half cup line inside. The protein portion is equal to the size of a deck of cards. Meal Measure follows the USDA My Pyramid serving sizes and is top-rack dishwasher safe.
 |
-Easy to use
-measure your food right on your plate
-Fits most dinner plates
-Stop overeating
-Top-rack dishwasher safe
- $9.50 SUPER CHEAP!!
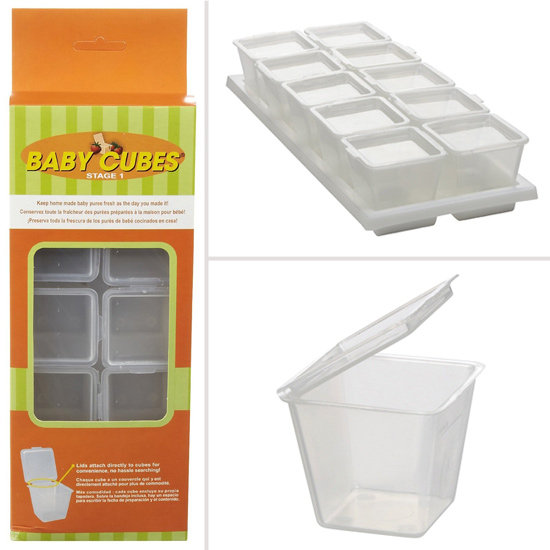
I know what you're thinking — these Baby Cubes (set of 10 for $7) are meant for storing homemade baby food. But because they're one-ounce containers, they're perfect for storing small portions of dry snacks like nuts, seeds, or dried fruit. They're lightweight and BPA-free, and the lids are attached so you don't have to worry about losing them. Stash a cube in your desk drawer, purse, or gym bag.
http://www.amazon.com/Baby-Cubes-Food-Storage-Containers/dp/B001B5DTO2/ref=sr_1_1?s=baby-products&ie=UTF8&qid=1337785850&sr=1-1
Portionware includes 5 plastic bowls and lids. The sizes are 1/2 cup, 3/4 cup, 1 cup, 1-1/2 cup and 2 cups. Each bowl has a fill line. Lightweight, durable and portable, portionware is great to take anywhere $29.99
 |
| Fitsugar.com |
http://www.amazon.com/Baby-Cubes-Food-Storage-Containers/dp/B001B5DTO2/ref=sr_1_1?s=baby-products&ie=UTF8&qid=1337785850&sr=1-1
 |
| http://www.portionware.net/shop.html |
 |
Friday, October 19, 2012
Back Strengthening Stretches
Almost everyone can benefit from stretching the soft tissues - the muscles, ligaments and tendons - in the back, legs, buttock, and around the spine. The spinal column and its contiguous muscles, ligaments and tendons are all designed to move, and limitations in this motion can make back pain worse.
Patients with ongoing back pain may find it takes weeks or months of stretching and other back exercises to mobilize the spine and soft tissues, but will find that meaningful and sustained relief of back pain will usually follow the increase in motion.
Keep the following in mind when starting a stretching routine as part of a program of back exercises:
-Wear comfortable clothes that won’t bind;
-Stretching should be pain free; do not force the body into difficult positions;
-Move into the stretch slowly and avoid bouncing, which may actually tear muscles;
-Stretch on a clean, flat surface that is large enough to move freely
Press Up: Sphinx Position

Start by lying on your stomach. Begin to raise your upper body slowly, while keeping your pelvis flat to the floor. Try to create an arch in your low back. Go up only as far as you can without discomfort. Work up to the Sphinx position, where your forearms are in contact with the ground. Then over time begin to press up. If you are flexible, you may be able to straighten your arms fully over time. Hold for 10 seconds, then repeat.
Superman

Start by lying on your stomach with face down. Raise your shoulders and hold yourself up with your arms extended in front of you. Hold for 30 seconds, then return to starting position. Repeat exercise ten times.
Standing Back Extension

Standing Back Extension (above left) - This exercise can be done at work or any other place where doing a press up on the floor is practical. Start with hands on low back. Slowly arch backward as far as you can without discomfort. Hold only for three seconds, and return to starting position. Repeat five times.
Piriformis Stretch

Lie down with your right knee up, and both arms stretching outward at 45 degree angles away from your body. Slowly let your right knee fall across your body to the ground. Keep your shoulders as flat as possible. Hold for 30 seconds. Return to starting position. Raise your left knee and let it fall across your body to the right side. Hold for 30 seconds. Return to starting position. Do the exercise ten times, alternating knees.
Cat

Start on all fours. Create an arch in your low back by raising your abdomen toward the sky, while at the same time bowing your head. Hold for 30 seconds. Go back to starting position.
Cow

Arch your back the opposite direction by lowering your abdomen toward the ground, while at the same time raising your head. Hold for 30 seconds. Go back to starting position. Repeat exercise 20 times.
Knee to Chest

Start with both legs and heals together flat on the ground. Raise your right knee upward and pull it toward your chest with your hands. Hold for 30 seconds, then return to starting position. Repeat with other leg. Do ten repetitions with each leg, alternating between right and left leg.
Body Flexion

Start on your knees with hands across abdomen. Slowly lean forward and let your body curl forward, keeping your head off the ground. Hold for 30 seconds. Repeat several times.
Runner's Stretch

Start in a sitting position with legs extended and feet together. With your hands flat against the ground, slowly extend forward as far as you can comfortably. Hold for 30 seconds and relax. Repeat stretch ten times.
Advanced Reach

This exercise is more difficult than it looks. Start on all fours. Raise your right leg backward, and raise your left arm up reaching in front of you. Hold for ten seconds. Go back to starting position. Repeat position with left leg and right arm. Do the exercise ten times alternating legs/arms.
Hyperextension


Start by lying on your stomach with your hands behind your back. Then raise your chest and feet off the ground. Hold for 5 seconds.
http://orthopedicinstitutesf.com/education/back_exercises.html
http://www.spine-health.com/wellness/exercise/stretching-back-pain-relief
Subscribe to:
Posts (Atom)
